Here are some cards that I made while I was off work a month or so ago:
Showing posts with label crafting. Show all posts
Wednesday, July 25, 2012
Monday, July 16, 2012
Crafty Project: Decorated Picture Frame
This is a project I did back in June for my mum's birthday present but never got around to posting about it:
Here is the only picture I could find of the frame before I started working on it. I'm gutted I didn't take proper before pictures. This is a habit I'm struggling to get into.
Before:
Here are the after photos. I first painted the frame. Pale blue on one side and pale pink on the other side. Then I used some of my endless supplies of craft supplies to decorate it. Here are the after shots:
I really enjoyed doing this. It was like therapy for my mind. And my mum was really pleased to get something so personal.
Here is the only picture I could find of the frame before I started working on it. I'm gutted I didn't take proper before pictures. This is a habit I'm struggling to get into.
Before:
Here are the after photos. I first painted the frame. Pale blue on one side and pale pink on the other side. Then I used some of my endless supplies of craft supplies to decorate it. Here are the after shots:
I really enjoyed doing this. It was like therapy for my mind. And my mum was really pleased to get something so personal.
Monday, May 14, 2012
Organising my card and paper stocks
Who knew I had so much card.
As I was getting back into card making and I am getting a Sizzix Big Shot for my birthday I decided that I needed a more organised way of getting to my card and paper stocks than before....
Yikes.
So I went on a hunt to the Range in Aldershot (my latest den of all things crafty) and while perusing the craft section (one bit of it anyway), I found this:
Perfect. Absolutely bloody perfect. Its actually by Papermania (a supplier of many very pretty cards/papers, toppers etc) and is 12x12 inches (well, thats the size paper/card that it fits in the pockets anyway). The folder itself is probably bigger than that. I bought that and an extra wallet of folders. Going through all my card, I decided that I'd like it in the order of the rainbow. I mean, why not? If you're gonna organise colours, what better way to do it. I had to go on Google to check what order that actually was!!! This is the picture I worked from:
So here are my organised pages. I love it. It made me feel all happy inside (sad, I know)!!!
As I was getting back into card making and I am getting a Sizzix Big Shot for my birthday I decided that I needed a more organised way of getting to my card and paper stocks than before....
Yikes.
So I went on a hunt to the Range in Aldershot (my latest den of all things crafty) and while perusing the craft section (one bit of it anyway), I found this:
Perfect. Absolutely bloody perfect. Its actually by Papermania (a supplier of many very pretty cards/papers, toppers etc) and is 12x12 inches (well, thats the size paper/card that it fits in the pockets anyway). The folder itself is probably bigger than that. I bought that and an extra wallet of folders. Going through all my card, I decided that I'd like it in the order of the rainbow. I mean, why not? If you're gonna organise colours, what better way to do it. I had to go on Google to check what order that actually was!!! This is the picture I worked from:
| source |
Monday, May 7, 2012
Projects Board
While perusing my RSS blog app on my iphone, I found this post and it inspired me into a 10 minute project to distract me from what I was REALLY meant to be doing.
I have tried several to do systems both technological and physical (chores charts and suchlike) but no matter how pretty and functional they are I never manage to stick to them for very long. The joy of this one was that its purpose is purely to focus the mind on the (craft/organisation etc) projects on the go or that I plan to start on next.
I also love that its located in my "office" and so its my domain and so if I wanted to stick it straight onto the wall with doublesided sticky tape (and I did want to - husband will gasp with horror) I could (and I did).
I started sticking double-sided sticky tape to the pegs (and then cutting the tape off at the edge), then sticking the pretty retro ribbon onto the pegs. Then I found the paper that I wanted to use as the background. Then decided that it would look nice framed, so cut down the first sheet so it could sit nicely on top (and inside) the 2nd sheet of decorative paper. I put the label together with glitter sticker letters that I bought for my chores chart that I put together recently and stuck it all together with doublesided sticky tape (got to love that stuff). I used black card that I had lying around to create the little cards that are to hold my "projects" and I wrote the names of a couple of projects using my white wet erase chalk pen.
See below for the finished product. I LOVE LOVE LOVE it!!!
I have tried several to do systems both technological and physical (chores charts and suchlike) but no matter how pretty and functional they are I never manage to stick to them for very long. The joy of this one was that its purpose is purely to focus the mind on the (craft/organisation etc) projects on the go or that I plan to start on next.
I also love that its located in my "office" and so its my domain and so if I wanted to stick it straight onto the wall with doublesided sticky tape (and I did want to - husband will gasp with horror) I could (and I did).
I started sticking double-sided sticky tape to the pegs (and then cutting the tape off at the edge), then sticking the pretty retro ribbon onto the pegs. Then I found the paper that I wanted to use as the background. Then decided that it would look nice framed, so cut down the first sheet so it could sit nicely on top (and inside) the 2nd sheet of decorative paper. I put the label together with glitter sticker letters that I bought for my chores chart that I put together recently and stuck it all together with doublesided sticky tape (got to love that stuff). I used black card that I had lying around to create the little cards that are to hold my "projects" and I wrote the names of a couple of projects using my white wet erase chalk pen.
See below for the finished product. I LOVE LOVE LOVE it!!!
Friday, April 13, 2012
Organising and decluttering the toys and tidying up kitchen/craft table
On saturday I am going to be helping a friend out with her kids play room. I thought before I go and do that (my first organising job in someone else's house) I should probably have a go at my own kid's toys.
While it wasn't that long ago that we bought a new toy storage unit and re-organised everything to fit, somehow (as always happens) toys have managed to get out of control again. In addition to all the toys in the unit itself, we also now have a big box of blocks and a toy garage that they regularly play with. I decided that (in preparation for my job on saturday) it would be a good idea to have a practice run at home. I also wanted to test out on Joshua the idea of getting your kids involved in purging their toys.
I explained to him that there are too many toys to fit in the toy drawers and that we need to get rid of some (or move them to his bedroom). We started going through the toys, drawer by drawer. He agreed to throw away any broken toys (that he didn't LOVE enough to want us to fix - or that weren't fixable - or that we were NEVER going to get around to fixing). I was really impressed with him.
I don't really have a picture of what it was like before as it didn't really look that bad but there were a few things that wouldn't fit in the drawers and a few things that just seemed to "hang around".
I had also wanted to label the toy bins since we got the unit. At the time I started this my labels hadn't arrived and I wasn't sure if they would be right there so I'd drawn labels (pictures of what should go in each bin) directly onto the plastic bins. You can see what that looked like as I don't yet have labels for the top bins. I think the black labels look much nicer (bought on ebay).
This is what it looked like before (although it didn't stay that tidy and the tray/tidy thing on the top ended up just collecting clutter and became a bit of a dumping ground - I SOOOO wish I'd taken a BEFORE photo!).
This is what it looks like after my labelling frenzy:
Because of all the things that we either chucked out or relocated to the kids' bedroom I've actually GAINED a drawer that has NOTHING in it (the blue bottom right one that has no label on it).
I moved the tray thing so that I could use the top of the toy storage unit to keep bigger toys and some of the larger cars that either wouldn't fit in the drawers or ended up having a single drawer to themselves. I quite like having these bigger toys "on display" like that. I'm also trying to get Joshua (Lala is a bit young at the moment) to get used to playing with one thing and then putting it away when he's done. The same with the craft table. He'll play with paints and then the paints will stay out and the paper will go all over the floor..... I'll get to how I reorganised that area though in a minute.
Tools, cars (this hasn't really changed although I did get rid of quite a few cars that were either never played with or broken)
And the bottom two bins contain:
Electronic or noisy toys (drums, laptops, piano toys etc)
Lala's toys (dolls, balls, more baby type toys).
I am very pleased with how nice my labels look. And Joshua was very excited watching me drawing the pictures. Hopefully it will help him know where to put things when he's finished playing with them. Although I have to keep reminding him not to just dump things all over the floor and then wander off and play with something else!
Sometimes I think that even if your house is generally a mess, you have to ignore the day to day mess and do something that you have been meaning to do for ages. I tried all day to get the kitchen under control but I couldn't concentrate. I think my brain needed to feel that I was achieving something that was not just going to be undone in an hour! So in the end I gave up on the kitchen and washing up and tackled the toys, as above. And once, I'd mostly finished with that, I moved onto the kitchen/craft table which was an utter mess. It wasn't just the table that was a mess. There was paper and craft bits all over the floor. It was horrendous:
While it wasn't that long ago that we bought a new toy storage unit and re-organised everything to fit, somehow (as always happens) toys have managed to get out of control again. In addition to all the toys in the unit itself, we also now have a big box of blocks and a toy garage that they regularly play with. I decided that (in preparation for my job on saturday) it would be a good idea to have a practice run at home. I also wanted to test out on Joshua the idea of getting your kids involved in purging their toys.
I explained to him that there are too many toys to fit in the toy drawers and that we need to get rid of some (or move them to his bedroom). We started going through the toys, drawer by drawer. He agreed to throw away any broken toys (that he didn't LOVE enough to want us to fix - or that weren't fixable - or that we were NEVER going to get around to fixing). I was really impressed with him.
I don't really have a picture of what it was like before as it didn't really look that bad but there were a few things that wouldn't fit in the drawers and a few things that just seemed to "hang around".
I had also wanted to label the toy bins since we got the unit. At the time I started this my labels hadn't arrived and I wasn't sure if they would be right there so I'd drawn labels (pictures of what should go in each bin) directly onto the plastic bins. You can see what that looked like as I don't yet have labels for the top bins. I think the black labels look much nicer (bought on ebay).
This is what it looked like before (although it didn't stay that tidy and the tray/tidy thing on the top ended up just collecting clutter and became a bit of a dumping ground - I SOOOO wish I'd taken a BEFORE photo!).
This is what it looks like after my labelling frenzy:
Because of all the things that we either chucked out or relocated to the kids' bedroom I've actually GAINED a drawer that has NOTHING in it (the blue bottom right one that has no label on it).
I moved the tray thing so that I could use the top of the toy storage unit to keep bigger toys and some of the larger cars that either wouldn't fit in the drawers or ended up having a single drawer to themselves. I quite like having these bigger toys "on display" like that. I'm also trying to get Joshua (Lala is a bit young at the moment) to get used to playing with one thing and then putting it away when he's done. The same with the craft table. He'll play with paints and then the paints will stay out and the paper will go all over the floor..... I'll get to how I reorganised that area though in a minute.
Now, from the top we have:
Food, Blocks (previously in a separate box in the corner of the room - I filled this bin and then bagged up what was left to give away)....
Little people/figures/animals
Books (previously didn't really have a place for books - not downstairs anyway)...
Tools, cars (this hasn't really changed although I did get rid of quite a few cars that were either never played with or broken)
And the bottom two bins contain:
Electronic or noisy toys (drums, laptops, piano toys etc)
Lala's toys (dolls, balls, more baby type toys).
I am very pleased with how nice my labels look. And Joshua was very excited watching me drawing the pictures. Hopefully it will help him know where to put things when he's finished playing with them. Although I have to keep reminding him not to just dump things all over the floor and then wander off and play with something else!
Sometimes I think that even if your house is generally a mess, you have to ignore the day to day mess and do something that you have been meaning to do for ages. I tried all day to get the kitchen under control but I couldn't concentrate. I think my brain needed to feel that I was achieving something that was not just going to be undone in an hour! So in the end I gave up on the kitchen and washing up and tackled the toys, as above. And once, I'd mostly finished with that, I moved onto the kitchen/craft table which was an utter mess. It wasn't just the table that was a mess. There was paper and craft bits all over the floor. It was horrendous:
I first of all cleared the windowsill (I didn't take a picture of this but it was dirty and needed cleaning) and wiped it down. Then I started clearing the table. Anything that needed washing I dumped in the sink, I got a binbag and got rid of any dried paint, used paper (non-masterpieces), "sticking" bits and bobs that were not in good condition and basically anything that looked like rubbish and gave the table a really good clean.
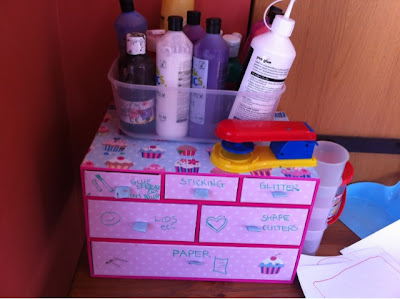
I relocated the paints from the top of the fridge to on top of the drawer unit and labelled the drawers:
I found an unused tin that had previously had sugar in it (before I moved all that stuff into glass jars during my larder rejig) and put pens and pencils in it.
As you can see, the kids are enjoying having a nice clean table to play at! This was also the first time Lala had sat at the table to do drawing. She sat there for AGES happy as a happy happy thing (can't think of any clever comparisons right now, but she was QUIET and sat still so that shows how HAPPY she was! lol).
In other news I got myself a new kitchen bin! Woopee!!! No more plastic bags hanging on the bottle opener for the dog to tear a hole in and empty all over the floor!
Subscribe to:
Posts (Atom)


